Sunday, November 25, 2018

The Soddy Grows Up

In my last post, we left my homesteaders ready to prepare their home site for the construction of their sod house. Their first step will be to stake out the corners of the house, but they must wait for a clear night so that one wall can be lined up with the North Star. In true pioneering spirit, the homesteaders want their home to stand "square against the world."

After the corners have been staked out, the homesteader, hopefully with the help of a neighbor, will begin cutting the sod blocks. The house will have an inside measurement of 14' x 18' and will require approximately one and a half acres of sod. Each sod block weighs about 50 pounds, and is limber rather than rigid, so carrying and laying the blocks is ideally a two-man job.

It will take my homesteader two to three weeks to build his soddy, depending on the weather and on how much help he can muster. Meanwhile, he and his wife will live in their covered wagon, thankful that the weather is warm. Not all settlers arrive in a wagon. Some come by train; others are on foot. Without the convenience of a wagon to provide temporary shelter while their soddies are constructed, these settlers resort to carving a "dugout" from a hill or embankment. This cave-like shelter has only dirt for the floor, the roof, and three walls. A piece of canvas can be hung to cover the front opening. If canvas isn't available, a rough, movable wall might be created using brush and small branches gathered from the banks of the nearest creek.

I'm sorry to say that my sod house will not be completed in such a short time as two or three weeks - or probably not even in two or three months! But I've accomplished some things, in spite of myself, and the following photos show my progress. Of course, the photos also show my usual setbacks as I get started - and restarted.


MOVING FORWARD - AND BACKWARD 


I started laying the first course of sod blocks on the flat, unassembled styrofoam walls, thinking that working with the walls lying flat would be the fastest method. I soon realized that the blocks weren't all lined up evenly with the bottom of the wall - because the bottom of the walls weren't completely even. When I raised the walls upright for a trial run, the blocks were poorly seated, which made the walls wobbly. 


 I removed the uneven first course of sod blocks and secured the walls in their upright position, using my usual toothpicks-and-glue technique. Then I started over, laying the blocks flat on the base board.
Success! Now I can proceed with laying the sod blocks.


THE PROCESS


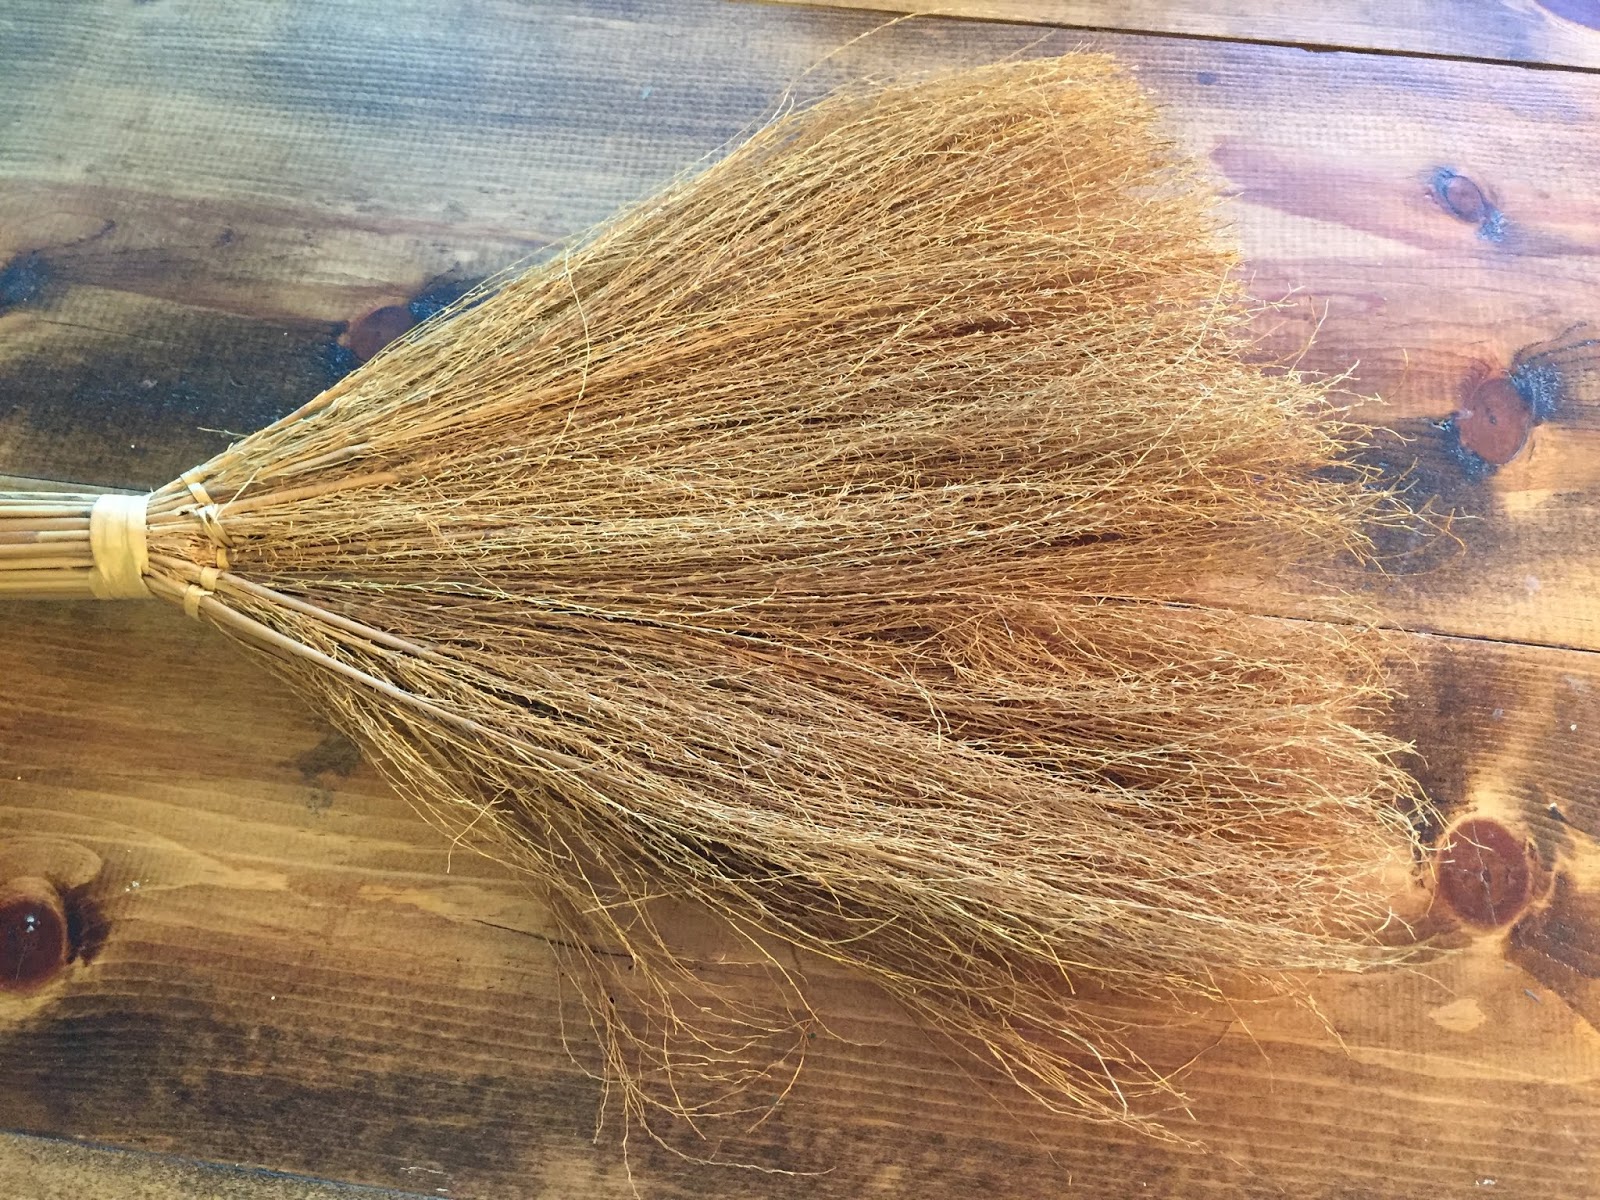
I cut a shank of prairie grass (oven-roasted corn silk) into bits of about 1/4" in length.


Next I use a brush to apply glue to the bottom front edge of a sod block. I tried just dipping the edge into the glue, but that became very sticky and messy very fast. The brush prevents (mostly) such sticky, icky fingers. I also apply glue to the back edge of the block, which will be placed against the styrofoam wall.


Then I press the glued front edge of the block into the grass.


Finally, the block is laid in place and pressed against the styrofoam wall. I also insert toothpicks at intervals to secure the sod blocks. The excess grass that you see in this photo will be gently brushed away. Every fourth course or so, the sod blocks are laid crosswise instead of lengthwise along the wall, in order to bind the inner and outer blocks firmly together and add stability to the structure.
(You may remember that my solid styrofoam "inner" walls would, in Real Life, be an inner wall of sod blocks just like the outer wall.)


The sod blocks are laid with the grass side down, allowing the roots to grow upward into the blocks above, strengthening the wall.


MOVING UPWARD


Hmmm...these walls seem to have grown a little taller since the first two photos in this post. You will not be a bit surprised to learn that I had to increase the height of the walls because of an OVERSIGHT! Yes, I made a mistake! Or, actually, I thought I had made a mistake, but as it turned out, I was mistaken in thinking that. 


THE STORY

 As I was laying blocks on one of the end walls, I took a long look at the window opening, and I remembered that there is supposed to be a half-inch space between the top of the window frame and the support beam over the window. This space would have been filled with paper or cloth to provide a "buffer zone" so that as the sod blocks settled, the weight of the wall wouldn't break the window panes. The same is true of the door frame, to avoid jamming of the door. I realized that if I belatedly cut that half-inch of space, the support beam would be too close to the roof, allowing no space for the roof beams.

 I set about correcting the error by adding an inch and a half to the height of the walls. That makes the walls higher than I would like, but not unrealistically high. Of course, the addition meant some more interior work, as you'll see below - and the end of this story will follow.  


I had to add more wine packaging "bumps" to the addition...


...then cover the bumps with joint compound. Then sand a bit and eventually repaint the entire room.


At this point, before I painted the room again, I got out my windows - four of them - and tried them again for fit. And - guess what?! All four were consistently exactly one-half inch too short for the window opening! Yes. When I had cut the window and door openings, I had, with due diligence and great intelligence, allowed the necessary extra half-inch that was needed for the paper or cloth buffer. Except that I had let too much time pass before moving ahead with the construction and forgot what I had already done. My memory is way too short for such a long time lapse. So there you have it - my full confession. I may yet reconsider and saw off most of that addition, making another mess and a lot more work. But that'll be another story!


COURSE BY COURSE


This is a close-up photo of the low back wall. There is an implied solid sod wall here, but I've left it open for viewing purposes. 


I initially thought that I would stucco the top of the wall the same as the interior, then I changed my mind and treated the wall as it would have looked during the sod laying. The adjoining wall edges will later be treated the same. I just need to decide how those sod blocks would be laid, and that will be easier to determine after the corners are finished.


In this close-up of the top of the wall, you can see the grass roots entangled in the sod. The roots were so tough and thick that as the sod was cut into strips by the cutting plow, the ripping grass roots made the sound of a giant zipper being opened.


Building up the sod courses. Each course should be laid all around the structure before the next course is started, in order to keep the walls as level as possible. A course of "crosswise" sod blocks is ready to lay.


A course of crosswise blocks has been completed along one end of the house.


The sod walls grow higher along the front and west end....


...and another "binding" crosswise course has been completed on the west end.


That's the extent of my progress to date. The walls will continue to grow upward as planned, but otherwise, construction will be by trial and error as I move on to the next steps. In spite of the various setbacks - with more certain to follow - I'm enjoying this project immensely, even while wading into unknown territory. But as I navigate through the unknown in the safety of my workroom, I imagine with what trepidation and uncertainty those pioneers faced the building of their own homes and the settling of a new land. What courage!


Thursday, October 11, 2018

Steps, Missteps, and Next Steps


In 1862, the Homestead Act was passed, and many hopeful settlers began arriving in Nebraska from points east - and from foreign countries. For a $10 filing fee, any homesteader over the age of 21 could claim a quarter-section of land. After living on the claim for five years, and making improvements, the homesteader became the proud (or not) owner of 160 acres. Since there were few trees or stones available, the building material for homes was, of necessity,  the tough prairie sod, cut into blocks that were held together by a mat of grass roots. As time passed and more settlers arrived in Nebraska to build sod homes, the construction techniques were improved through shared experience.

The homesteaders who will live in my sod house have arrived in Nebraska in 1886, with only their most necessary household goods and tools packed in a covered wagon. There are sufficient railway lines now to enable them to order goods from back east - but the cost is prohibitive, and much time must be allowed to receive a shipment of supplies. For my homesteaders, as for most, "making do or doing without" is the usual way of life on the prairie.

After selecting the best possible building site - near a creek for a water supply, within a day's wagon trip to the nearest settlement, and only an hour's walk to a neighboring homestead - my pioneers are eager to begin cutting sod and building their new home on the treeless plains. 


FINALLY, MY MINIATURE SOD HOUSE IS UNDER CONSTRUCTION!


The first step in constructing the soddy was to purchase a 4' by 4' piece of pressed wood (or something like pressed wood) from which to cut the base board for the house and its surrounding yard.


The cut board measures 28 inches by 36 inches. I've drawn the outline of the 2 1/2 inch thick walls on the board. You can also see the window and door placement and the red dots where I will drive in the nails that support the styrofoam walls.


Nails have been driven through the board from the underside so that the points project upward and can easily penetrate the styrofoam walls.


 I cut the three main walls and the low back wall from a 1 1/2 inch thick sheet of styrofoam.

(That's Robert's second homemade kayak on the right; it's a 17-foot beauty made from thin strips of walnut, western cedar, and Alaskan cedar. Robert used a kit from Redfish Kayak in Port Townsend, WA.) I could build one too, but styrofoam doesn't take too readily to the water.


What a fast and easy little structure; the dry fit didn't take long! This is the "inner core" structure. Rather than lay sod blocks for the entire structure, I will lay the blocks as an outer wall, creating only the illusion of two thicknesses of sod blocks, which would have been the Real Life construction technique. The interior measures 14 inches by 18 inches with an exterior measurement of 19 inches by 23 inches.


I've cut the door and window openings. Because of the thickness of the sod walls, very little light could enter a soddy, so the homesteader would put in as many windows as he could afford. My homesteader chose two large windows and two smaller ones; but he had to sacrifice having a wood floor and a wood roof. A sod roof and a dirt floor seemed a better choice than living in perpetual darkness. (I may have unduly influenced his decision, since I like a LOT of light in my home!)


The interior walls of a sod house were scraped with a sharp spade after construction to make them as smooth as possible, but after the sod had settled for a while, lumps and bumps inevitably appeared. I used pieces of egg cartons and wine packaging to rough up the walls.


This is the first layer of lumps and bumps. I applied joint compound over the cardboard pieces, but I forgot to take a photo.


The first layer didn't produce quite enough bumps, so I repeated the process...


...and applied more joint compound over the second layer of cardboard.


I smoothed out the joint compound. (But I didn't scrape the walls; I sanded instead.)


The interior walls of many soddies were plastered over with a soupy mixture of yellow clay, ashes, and water, and the walls were sometimes whitewashed as well. But a whitewashed wall couldn't stay white for long because of smoke stains from the cookstove or water stains from a leaky roof. (I will create more stains when the walls are erected and I have an idea of furniture placement, especially the wood cook stove.) 


I painted the exterior walls a dark color so that there would be no white styrofoam showing between the sod blocks.


Ah, the sod blocks! You may remember this Mystery Material from my previous post. I thought it would be the perfect thing for sod blocks, although it was oh so tough and hard to cut. But I optimistically believed that I could cut it with a fine-toothed saw. I couldn't. Not even with a power saw, which only sent black bits flying every which way and made a big mess. I could imagine what an ugly time I would have trying to cut as many sod blocks as I'll need. So - back to my usual stuff - the steadfast styrofoam!


I decided to cut the sod blocks from sheets of 1/2 inch by 12 inch by 36 inch styrofoam. The size is very convenient to work with.


I had discovered, in my experimenting, that the inside cuts of the styrofoam had ALMOST the perfect texture that I needed to replicate sod. After cutting one-inch wide strips of the styrofoam, I enhanced the texture by poking holes in the sod edge with a slightly blunt knife.


Things were moving along well. So well that I grew careless and FORGOT TO FOCUS. I had good intentions of trying out ONE strip of styrofoam to make sure that the spray paint would cover well and DO NO HARM. But instead, I put all the strips - every last one - into a paint box that I rigged up in the garage. And I sprayed the whole kit and caboodle in one fell swoop!


And I did a LOT of harm! The spray paint melted the styrofoam like a hot knife melts butter. And to add to the frustration, the spray paint didn't even cover well! The good thing is that I can still use much of the misshapen mess, because I'll need filler and odd pieces of sod as I build the walls.


So I started over with a new sheet of styrofoam. I hired Leo, my grandson who just celebrated his eleventh birthday, to poke the holes in the edges of the strips this time. (I told him I'd pay him a dime a strip. After a while, he asked how many he'd done. I said, "You've earned $1.60. How many do you think you've finished?" Without any hesitation, he told me he'd finished sixteen. He's quicker than his old granny in the numbers game!)


Strips cut, holes poked. Ready to paint - with acrylic paint and a brush this time!


Painting accomplished and NO HARM done! I've used a mixture of taupe, gray, and tan to achieve the color of old, dried sod.


The styrofoam strips have been cut into three inch pieces - and they're close to turning into sod blocks; I just need to add the prairie grass. This batch of sod blocks will be enough to get me started, but there are many more to come.


I had decided that corn silk would be an ideal material to replicate prairie grass, but I wasn't sure that it would dry to the red-gold color that I needed. But Lori, from "Works In Progress," suggested that I try drying the cornsilk in the oven at a low temperature - and that worked perfectly. Thank you, Lori! I "toasted" the cornsilk for about ten minutes at 250 degrees Fahrenheit ....


...which resulted in just the right color and texture for prairie grass. This big batch of "grass" should be enough to complete the soddy. And yes, we did enjoy eating fresh corn on the cob OFTEN this summer!


I've gotten this far so far, although I should have done more. It's been raining here for about forty days and forty nights, so although outdoor activities have come to a soggy halt and I'm confined indoors, my soddy time has been more limited than it should have been. Somehow various household tasks keep popping up to occupy my days. But I'm sort of on a Sod House roll now, so even if the sun should ever shine again, I'll be forced to neglect all outdoor chores and just concentrate on furthering the soddy construction. I hope that you'll stop by next time and see how (whether) those next steps are progressing.


Sunday, July 15, 2018

A House Made of Nebraska Marble


It seems like months since I've published a blog post, but my calendar says that my Tuscan Villa Grand Finale was published only six weeks ago! I had planned to take a somewhat short break from miniature construction before starting my next project, but the break felt a lot better than I thought it would, so I've managed to drag it on and on. I've accomplished a multitude of things that have nothing to do with miniatures, and that felt good too. But now I have that itchy tingle in my fingers and the distractions in my mind that tell me it's time to start shrinking my world again.

I've known for a long time that my next miniature build would be a Nebraska Sod House. Actually, I started building a soddy more than twenty years ago but became overwhelmed at creating the sod blocks - and overwhelmed at the amount of work space that I would need to create them. I set that project aside and moved on, but I never entirely gave up the idea. Now I have a simpler construction plan and more work space - so the sod house is an idea whose time has come.

Although I know that I'm going to build a sod house, I haven't yet decided exactly how I'm going to go about building it. I've done much research, and the finished sod house is held firmly in my mind. But I'm experimenting to find the right materials to use for the construction, so this post is just to introduce my intentions and show my exploration into possibilities and probabilities.


This tiny sod house in Nebraska is a long way and a far cry from the Tuscan villa that I just finished! The soddy is located at the Sod House Museum in Gothenburg, Nebraska.


This sod house has been here for a long time; mine won't be quite so settled and worn - but old dirt is still old dirt! I like the cactus cluster growing on the roof.


The setting here is a bit more lush than the "treeless plains" that would have originally and realistically surrounded the house.


This bison is a full-size wire sculpture at the museum. The roaming buffalo are gone - but the memory of their majesty lives on. 


These are my research tools; I've had most of the books for twenty-plus years, but a few are recent additions.


I bought this book to research my first attempt at building a sod house; it's still the most instructive and informative of the lot and makes me want to build a Real Life soddy along with the miniature version!


Solomon D. Butcher traveled extensively in Nebraska, photographing homesteaders during the 1880s and 1890s. His photographs are an inspiration and make Nebraska pioneering history come alive.


Another informative favorite, filled with soddy construction techniques and humorous illustrations. 


Prairie sod, or "Nebraska Marble," was used out of desperation as a last-ditch building material by homesteaders on the Nebraska plains, where trees or stones were rarely to be found. Sort of the way I use styrofoam as a last-ditch material because even though wood is plentiful in Lincoln, it requires more skill than I possess. So styrofoam will be the building material of choice for my soddy's core construction.


To give texture to the "sod" blocks that I need, I've looked at several options. The texture of cardboard egg cartons may not be pronounced enough, but I found that wine crate packaging is sturdy and well textured, as are cardboard drink holders. The drink holders, however, don't have much usable surface - which is a drawback to the egg cartons as well. If I use the textured cardboard, I'll construct the walls from styrofoam and glue on strips of cardboard to resemble sod blocks. In the construction of a sod house, the blocks were laid in double rows to make the walls approximately 2 to 3 feet thick.


This is probably the optimal material, and I hope to use it for the sod blocks instead of the textured cardboard. I was so excited to find it that I didn't pay attention to what the product is called or what it's supposed to be used for. But I do know that it's a rubber-like material that's as tough (almost) as nails. I couldn't cut it with a knife, so I'll need to use a saw with a thin blade. This mystery material is the right thickness - sod blocks were 4" to 6" thick. They were cut 12" to 18" wide and 36" long and laid in the same way as bricks. Each sod block weighed about 50 pounds, so building a sod house was no easy task! But I especially like the texture of this material and the easy-to-handle strips that are 5 feet long and 4 inches wide. I have to experiment with painting the strips to achieve a taupe/gray/tan variation in color. If I use this material, I'll erect inner walls using styrofoam sheets, then lay blocks of this material as the outer sod block wall, rather than cut the hundreds of extra blocks for the inner wall.


I've also found several variations of prairie "grass" that will be glued to each sod block. I can, of course, try to use real dried grass, but so far I've seen only green grass, and I'd have to wait for it to dry and change color. This broom was in my stash and looks similar to dried grass, but it might not be flexible enough. When it's cut into very short lengths, it's likely to stick straight out instead of bending. That may be true of real grass as well.


This bag of vari-colored dried moss from Hobby Lobby has potential, but it may be too "curly" to  replicate wild prairie grass.


I picked up this bunch of something like seaweed from the shore of the lake where Robert was kayaking. It's too green, but I'm waiting to see whether it will turn a nice golden brown.


This is probably the perfect material to replicate the prairie grass that I need. I discovered it by accident when Robert bought some ears of corn at the store. Corn silk! Golden, light weight, flexible, easy to come by. I just have to let it dry out thoroughly. If it works as a grass substitute, we're going to be eating lots of corn for a while! 


I've come this far in my plans for the sod house, but the experimental phase will last a while longer. Then there's a floor plan to draw up; that won't be a demanding job, since there will be only one room in the soddy! But I will need to decide on the size, which I think will measure 14 by 16 inches on the inside, with a 20 by 22 inch exterior size. I'm still working on that decision, which must be made before I can cut and prepare the base board for the house. I'll also need to decide on the door, window, and chimney placement. This house will be the first that I've built that will be open in the back, thus making it possible - at last! - to have a front door and front windows. The completed soddy has a place reserved for it in our Nebraska Sandhills home, and it will rest on a centrally-located table, which will allow it to be viewed from all sides. I'm excited about that! I'm also excited to get started with the actual construction of this soddy, but I'm going to patiently plod along with the preliminary steps. I'll be back when I have some actual progress to show!

I hope you're enjoying your summer - I'm wishing you a long and lazy one.